Static and Dynamic Addressing 2 – Virtual Networking

Creating Virtual Networks
- Sign in to the Azure portal and search for Virtual Networks.
- Click the Create button to take you through the creation process.
- In the first section, fill in these inputs:
- Subscription: Select your subscription.
- Resource Group: Select an existing resource group or create a new one.
- Name: Enter the virtual network name.
- Region: Your virtual network will be scoped to this region.
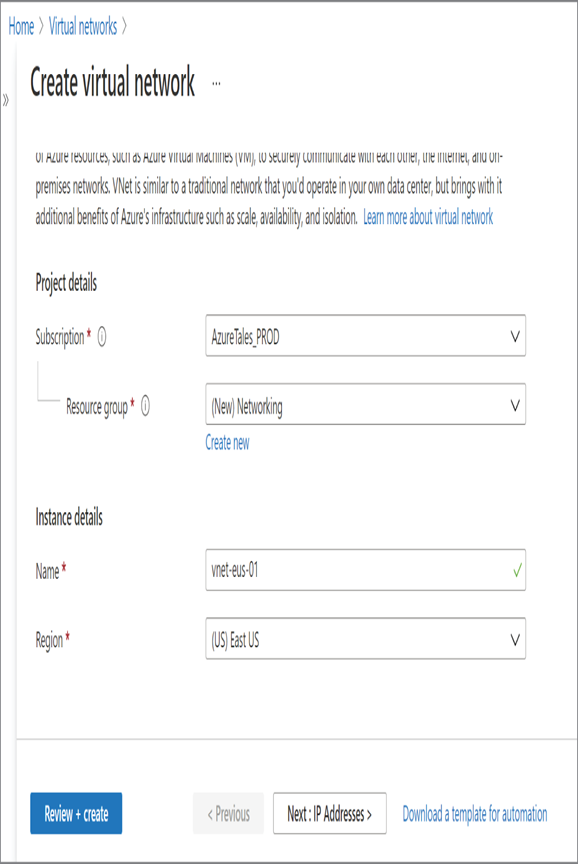
- Click Next : IP Addresses >. This will take you to the section to define the address space and subnet.
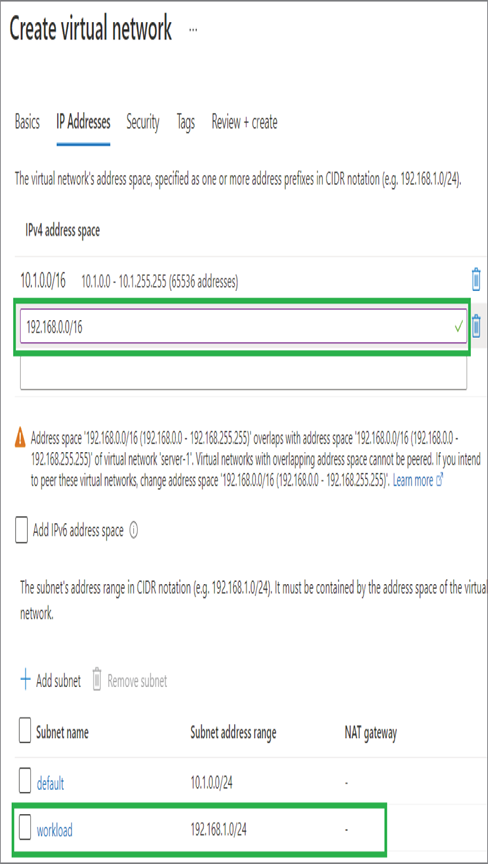
- By default, Azure will add an address space based on the virtual networks that you have in the region. You can remove this address space by clicking the trash icon, or you can add multiple address spaces to the virtual networks.
- When it comes to subnets, Azure will add a subnet named default to the virtual network, and you can add more subnets or modify the default one as required.
7. Click Review + Create, and your request will be validated. Once the validation is passed, you can click Create to create the resource.
In Exercise 3.1, you created a virtual network with address spaces 10.1.0.0/16 and 192.168.0.0/16. You also added two subnets, 10.1.0.0/24 and 192.168.1.0/24. When you deploy a supported resource like a virtual machine, internal-facing load balancer, etc., you can select this virtual network and corresponding subnet. The resource will then obtain an IP address from the subnet address range. The addresses that are part of the virtual network and subnet are private IP addresses. Once they are assigned to a resource, you can specify whether you need a static assignment or dynamic assignment.
Virtual networks can be created from Azure PowerShell and the Azure CLI as well. Using the code in Exercise 3.2, you will be able to create a virtual network from Azure PowerShell.
EXERCISE 3.2
Creating Virtual Networks Using Azure PowerShell
- Open your cloud shell or local shell. If you are using the local shell, make sure you are signed in to Azure.
- The first step in the process is to create a virtual network using the New-AzVirtualNetwork command. You need to pass in the resource group name, location, name of the virtual network, and address space as parameters. We will be storing the output of this command to a variable so that you can use reuse it during the subnet creation. You can use appropriate values as per your environment.
$vnet = New-AzVirtualNetwork -ResourceGroupName Networking -Name vnet-eus-02 -Location eastus -AddressPrefix 172.16.0.0/16
You can verify if the virtual network is created using the Get-AzVirtualNetwork command along with the name of the virtual network.
Get-AzVirtualNetwork -Name vnet-eus-02
3. The next step is to create a subnet. Use values as appropriate.
$subnet = Add-AzVirtualNetworkSubnetConfig -Name subnet-01 -AddressPrefix 172.16.1.0/24 -VirtualNetwork $vnet
4. Once the subnet is created, you can associate the subnet to the VNet using the following command:
$subnet | Set-AzVirtualNetwork
5. If you run the Get-AzVirtualNetwork command again, then you will see that the subnet you created is associated to your newly created virtual network.
Let’s take a quick glance at public IP addresses and understand where they are used.