Role Assignment – Compliance and Cloud Governance

You already saw what a role assignment is theoretically when we studied the concepts related to Azure RBAC. In this section, you will be reusing the custom role you created in the previous exercise and assigning that role to a user. Once it’s assigned, you will sign in as the user and verify the permissions you have given are correct and working as expected. See Exercise 2.5.
EXERCISE 2.5
Assigning Roles from the Azure Portal
- Sign in to the Azure portal using the Owner credentials.
- You will create a new resource group and a VM to evaluate the role. Since we have not discussed virtual machines yet, you can execute the following commands in Cloud Shell to create a VM.
- You need a resource group that can be created using the following command. Assume that you need the user to manage only this resource group, so the scope of the assignment should be the resource group.
New-AzResourceGroup -Name VMGroup -Location EastUS
4. You will create a VM for testing purposes using the following command. The password should be between 8 to 123 characters and should have any of three out of four complexity requirements: have upper characters, have lower characters, have a digit, have a special character. You will be asked to provide the username and password for the VM once you execute the command:
New-AzVM -Name server-1 `
-ResourceGroupName VMGroup `
-Image UbuntuLTS `
-Credential (Get-Credential)
- You will be able to see the progress in the shell, and once the VM is created, you will see confirmation.
- Exit the cloud shell. Navigate to Resource Groups and open the new resource group you created called VMGroup.
- Click the Access Control (IAM) blade. In every scope (management group, subscription, resource group, resource) you will see this blade; any changes you make in this blade will be inherited to all child items.
- Click Add and select Add Role Assignment.
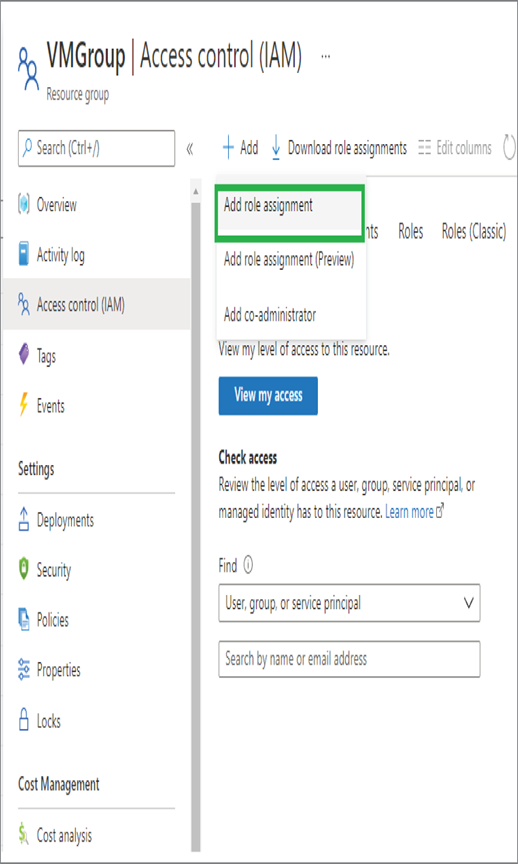
- In the side pane, you can select the Virtual Machine Supporter role and search for a user in your environment. If you do not have another user in your environment, refer to Exercise 1.2 and create another user before proceeding. The option Assign Access To will help you filter your search results. By default, the value is set to the user, group, or service principal. This means if you search, Azure will list the user, group, or service principal that matches your query. You can change this default choice to the user-assigned managed identity to filter the user-assigned managed identities.
- Search a user and select the user; the moment you start typing in the name Azure will start showing the matches. In this demo environment, user Doctor Strange has been selected. You can select one of the users present in your environment. Click Save to save the assignment.

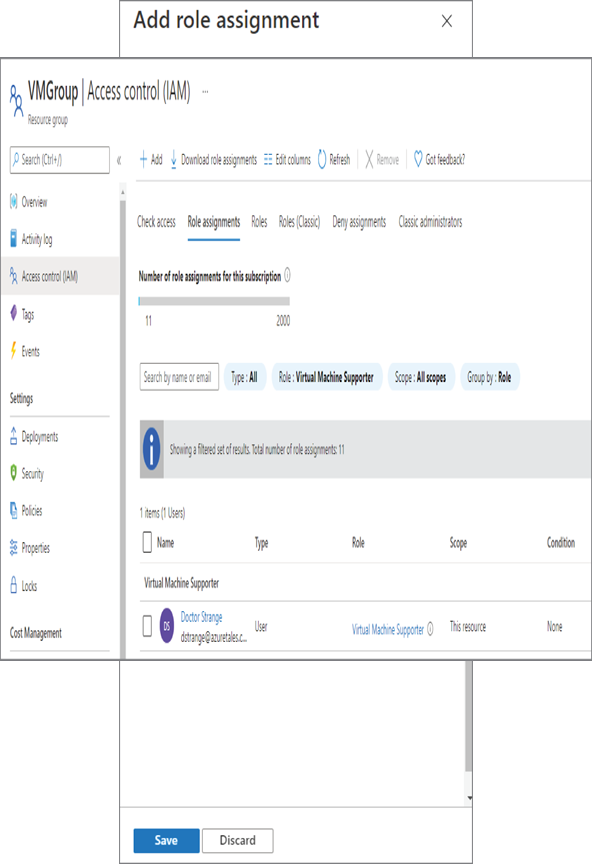
11. Navigate to the Role Assignments tab, and you will be able to see the assignment.
- Open an incognito window and sign in as the user you selected. If you do not remember the password, you can always reset the password as we discussed in Chapter 1. Once signed in navigate to the Virtual Machines blade (or search for Virtual Machines).
- You should be able to see the VM you created in step 4. Click the VM name and try to delete the VM using the Delete button. Click OK to confirm the deletion.
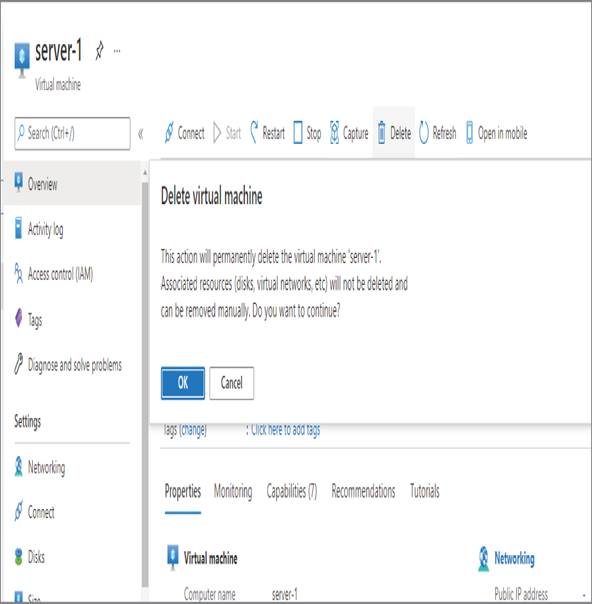
14. You will get an error message stating that you do not have enough permissions to delete the VM. This is because, in our custom role, we have not given the permission to delete. The only permission this role has is to view, start, or stop VMs. You could try to start or stop the VM, and that will work without any issues. However, any other operations will fail.
15. You can try working with support tickets if needed and see what the Virtual Machine Supporter role you created can do.
This Role Assignments blade can be used to see the existing assignments, add new assignments, and delete the assignments. Concisely, we created a custom role and tested the role using role assignment. On that note, we are winding up RBAC. The next topic we are going to cover is resource locks.