Record Management – Virtual Networking

Azure DNS supports all common DNS record types including A, AAAA, MX, CAA, CNAME, PTR, SOA, SRV, and TXT records. You are familiar with these records as they are used in traditional DNS servers as well. The categorization is done based on the data stored on each of these records. For example, A records map a name to an IPv4 address, and AAAA records map a name to an IPv6 address. Similarly, each of the record types has its own use-case scenarios.
Record sets are also supported in Azure; these are useful in cases where you would like to create more than one DNS record in a single shot referencing a given name and type. For instance, say you have two web servers with IPv4 addresses 137.12.11.1 and 137.12.11.2. You would like to map both of these IP addresses to the A record www.mydomain.com. In this case, you don’t have to create two DNS records; instead, you can create a DNS record set with the name as www under the zone mydomain.com and add both IP addresses to the same set. Using this all related IP addresses/aliases can be managed under a single record, and this offers ease of management for administrators.
While creating records, you can also specify the time-to-live (TTL). This value specifies how long the clients can cache this record before contacting the DNS server again for resolving the query. By default, this value is set to 3600 seconds or 1 hour. Since we are using records set, the TTL is set for the entire record, not for individual records. The value for TTL can be from 1 second to 2,147,483,647 seconds.
Wildcard records are also supported by Azure DNS. As we used to add wildcard using * in on-premises, we can add wildcards by setting the record name as *. You can also use wildcards as a leftmost label, say *.foo. All records matching this expression will be returned by the name servers.
Next, in Exercise 3.8, you are going to add records to the zone you have created.
EXERCISE 3.8
Adding Records to an Azure DNS Zone
- Sign in to the Azure portal and search for DNS zones and click DNS Zones. Select the DNS zone you created in Exercise 3.7.
- Click + Record Set to add a record set. You need to provide the name, type, TTL, and value for the record set. In this demonstration, you are creating an A record, and you can provide the values shown here.
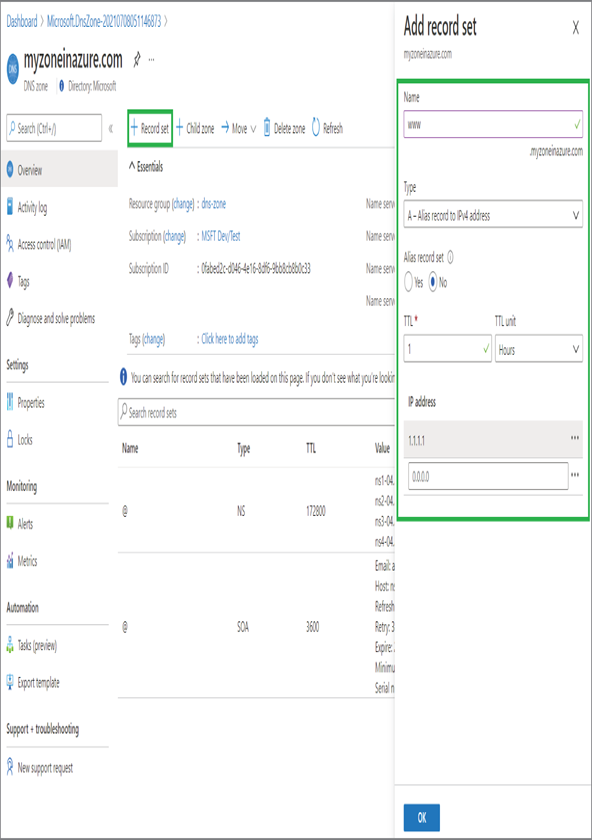
- After the record is added, it will be available in the records list.
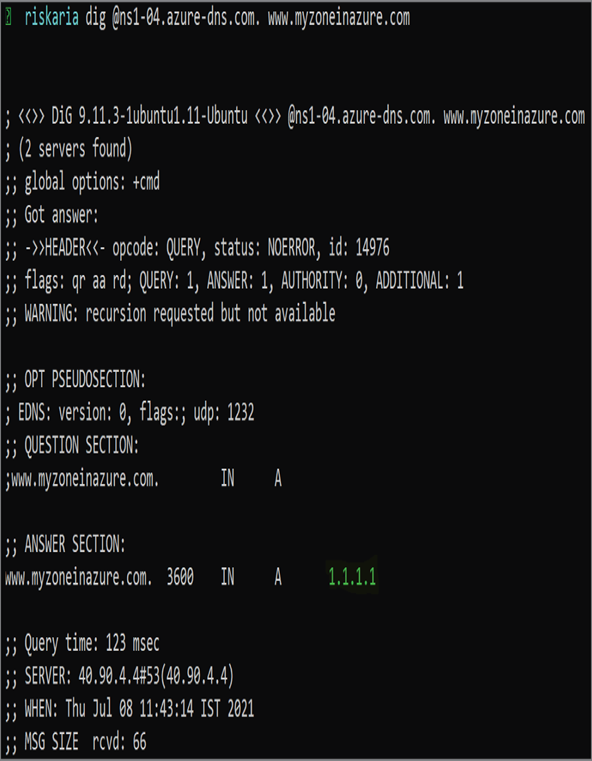
- Now you can open the nslookup utility if you are using a Windows computer or the dig utility if you are using a Mac/Linux computer to query the record. You need to copy the name of any name server and run the queries pointing to that name server to obtain results. In the graphic shown here, the dig utility is used to query the record, and we got the response as 1.1.1.1 as we saved in our DNS zone. The syntax for dig is dig @nameserver .
From this activity, you learned how to use Azure DNS zones to host our zones and add records. These records will be available if you point the query to one of the name servers of the zone. This process is equivalent to you creating a DNS zone in a Linux or Windows server and querying the server to resolve the record. While we were searching for DNS zones in the Azure portal, we saw there is another option called private DNS zones. Let’s see what private DNS zones is.