Public IP Address – Virtual Networking

Public IP addresses are associated with a virtual machine NIC, public load balancer, VPN gateways, application gateways, and any other resource that can be accessed from the Internet. Here also we can choose the allocation method to be static or dynamic. However, the availability of allocation methods depends on which SKU of public IP address we are using. The SKU is more like a pricing tier, where you will find different prices based on which SKU you are selecting. Let’s quickly compare the SKUs available for public IP addresses to understand the key differences. The available SKUs are Basic SKU and Standard SKU; Table 3.1 shows the differences between them. You can always upgrade from Basic SKU to Standard SKU.
TABLE 3.1 Understanding Public IP SKUs
| Feature | Basic SKU | Standard SKU |
| IP assignment | Static or dynamic | Static |
| Security | Open by default | Closed to inbound traffic and secured by default |
| Resources supported | VM NIC, VPN gateways, application gateways, and public load balancers | VM NIC, application gateway, and public load balancer |
| Redundancy offered | Not zone redundant | Zone redundant |
Now let’s perform an exercise to create a public IP address; see Exercise 3.3.
EXERCISE 3.3
Creating Public IP Addresses
- Sign in to the Azure portal and search for Public IP addresses. From the Public IP Addresses window, click Create.
- Set IP Version to IPv4 or IPv6 or Both. Depending on which IP version you require, you can select that. Selecting Both would create both IPv4 and IPv6 addresses.
- As you saw earlier, you can set the SKU to Basic or Standard depending on the requirements.
- Set the tier to the regional tier.
- Input the name of the public IP address. This will be a friendly name for you to identify the IP address.
- Next is the assignment; you can choose Static or Dynamic. If the SKU is Standard, then the option will be grayed out as Standard SKU supports only Static IP.
- You can also add a DNS label. This is an optional field; it is mostly used when the allocation is Dynamic.
- You can leave the routing preference and idle timeout with the default values. The routing preference determines how your traffic routes between Azure and the Internet, and idle time out helps you configure the minutes to keep a TCP or HTTP connection open without relying on clients to send keep-alive messages.
- Other than these fields, you need to select the subscription, resource group, and location for the public IP address. If you select Standard SKU, then you will get an option to choose the availability zone as well.
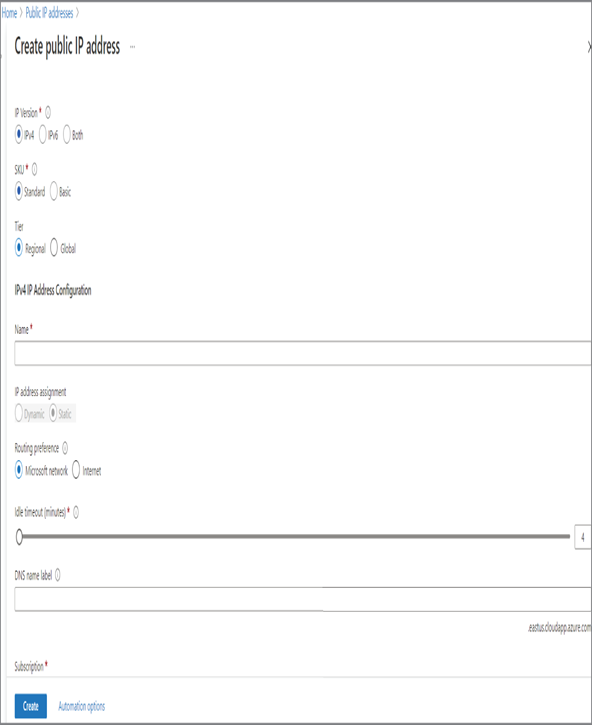
10. Once the appropriate values are selected, you can click Review + Create to validate the deployment. If the validation was successful, click Create to create the public IP address.
Once the public IP address is created, you can associate the IP address with any of the supported resources. This IP address will be Internet facing, and users can access the associated service over the Internet using this IP address. Having a public IP address that is open to the Internet leaves an attack vector and makes your workloads vulnerable. You need to use network security groups to control the traffic inbound and outbound to our resources. In the next section, we will cover network security groups and how they can be used to secure your workloads in the cloud.