Policy Assignment and Scope 2 – Compliance and Cloud Governance

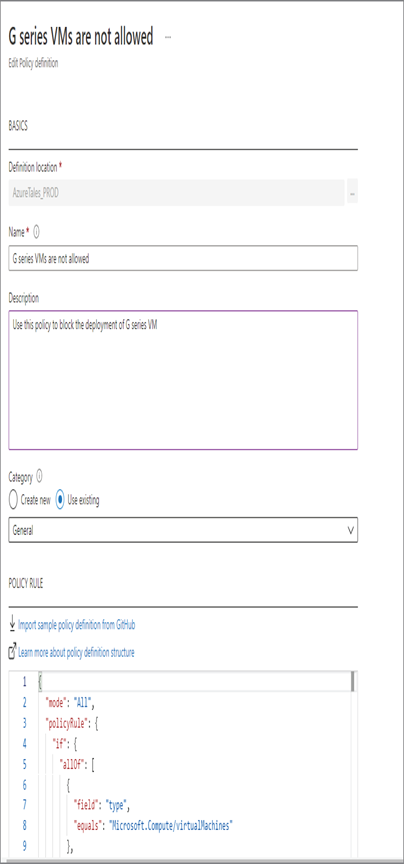
5. Once the values are entered as shown here, you can click Save to save the definition.
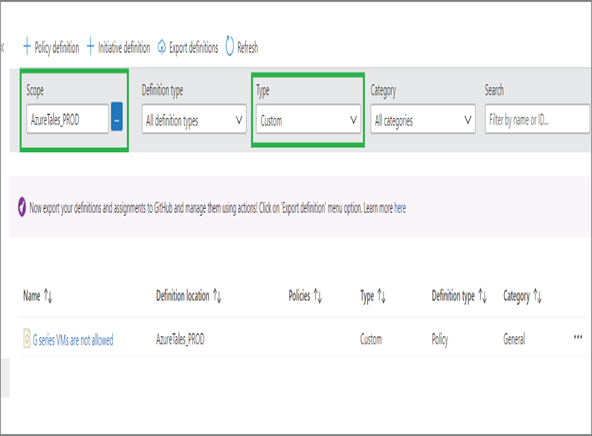
6. Now that you have created the custom policy, it will be added to the definitions within a few seconds. You can confirm if the policy is created by filtering using the type as Custom. Since you do not have numerous custom policies, this filtering is enough. In a production environment, there will be multiple custom policies, and you can leverage the category and search options to narrow down the search. Also, make sure that the scope is the same as the definition location you selected while creating the custom policy.
- Selecting the custom policy will give you the option to assign, edit, duplicate, delete, and export the definition. You can proceed with the assignment process by clicking Assign.
- In the assignment window, our policy only requires input to the Basics tab. In some policies, you might need to add parameters. If your definition has any parameters as in listOfAllowedLocations, which we saw in the case of “Allowed locations” policy, is an example of a parameter. Our current policy does not have any parameters. On the Basics tab, you can add the following details:
- Scope: This is the scope where you would like to apply the policy.
- Exclusions: If you would like to exclude any resources from the policy evaluation, that exception can be added here. Even if the resource is noncompliant, it will not be reported as we have passed the exclusion.
- Assignment Name: Give a friendly name for your assignment. By default, it will be the name of the policy you have selected.
- Description: You could add a description about the reason for assigning this policy. In the future, if another administrator looks into this assignment, they should be able to understand the rationale behind this assignment.
- Policy Enforcement: If this is set to Disabled, compliance evaluation will be available; however, the user will not be denied from creating a resource. We can keep it as Enabled as we need to deny users from deploying G series VMs.
- Assigned By: This is the name of the user who is assigning the policy. The default value is the sign-in name of the user who is assigning this policy. This is useful if you are using a generic admin email for assigning policies and you want to mention your name for letting others know who assigned the policy.
- After adding the details, clicking Review + Create will create the assignment. Once the policy is assigned, you will get a message that it will take up to 30 minutes to run the evaluation and render the compliance dashboard.
- In most cases, you can see that the policy will kick in within 15 minutes.
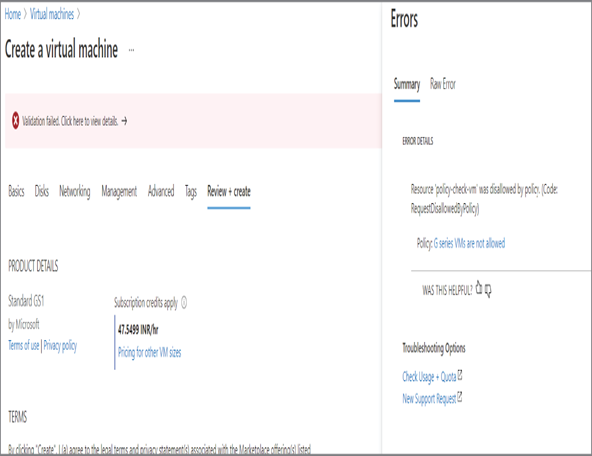
- Trying to create a G/GS series will fail during the validation with the error message stating RequestDisallowedByPolicy.
This was the end-to-end process from the creation, scoping, assignment, and validation of the policy. Here, we have used a custom policy; you could also use built-in policies for testing.
Now, we have used a single policy and its action on the scope. Think of a scenario where you have multiple policies defined by your organization. If the numbers are exceedingly high, assigning them one by one and managing them is going to be a tedious task for an administrator. Here comes the role of policy initiatives; in the next section, we will cover initiatives.