Sometimes performing actions without caution will lead to accidental deletion or modification of mission-critical workloads that you have in your environment. In Azure, administrators can use locks to lock a subscription, resource group, or resource from getting deleted or modified. The lock will override any …
From the Azure portal, you can add/delete locks by following the instructions in this section. You can also add/delete locks from Azure PowerShell, the Azure CLI, ARM templates, and the REST API. The first step in assigning a lock is to understand which scope you …
Resource tags can be used to logically organize the resources in your environment. Each tag comprises a key-value pair, where you will be adding a name and a corresponding value. For example, if your key or name for the tag is Environment, you could have different values like Production, QA, Development, or Testing. Adding these tags will help you understand which environment a resource belongs to. These tags are reusable, which means you do not have to create them for each resource. Once the tag is created, you can use it with applicable resources.
Use Cases
There are several use cases for tags; the following are some examples:
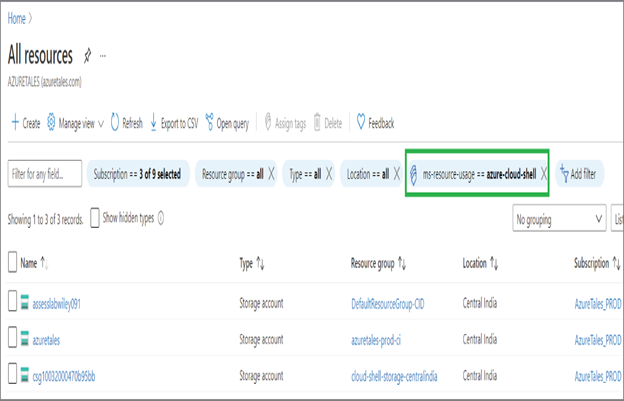
You can group and filter your resources using tags. If you navigate to the All Resources blade, in real-world environments there will be thousands of resources. Tags can be used to filter resources across different regions and resource groups. Here tags can be leveraged for filtering (refer to Figure 2.24).
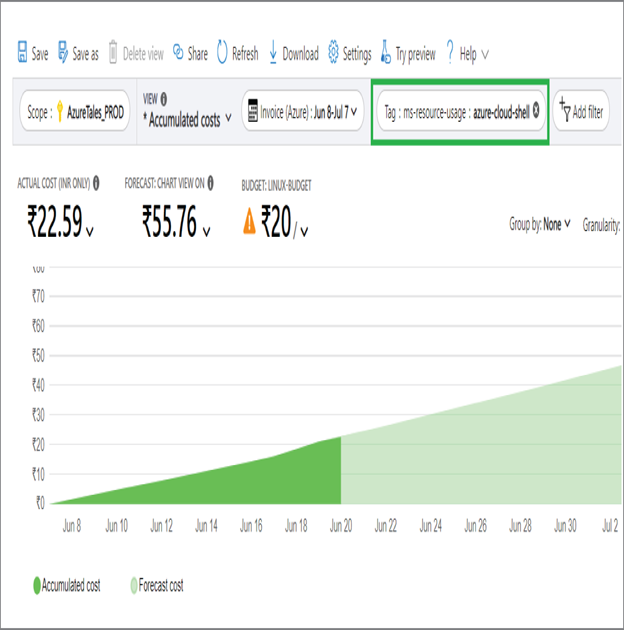
In Azure Cost Management, you can use tags to see the cost of resources to which the tag is assigned (see Figure 2.25). This is useful if you have the tag Environment with the values Production, QA, and Development; using the tag, you can easily identify the cost related to production, QA, and development resources.
When you download the usage report for your Azure consumption via REST API or from the portal, these tags will be present there are well. As this is a CSV file, you can easily apply filters and analyze the consumption.
Tags applied to resource groups will not be shown in Azure Cost Management because Azure charges you at the resource level. Tags at the resource group level are logical organization only. Also, tags applied at the resource group level are not inherited to resources by default.
Tags at the resource group level can be applied to resources using Azure Policy. Refer to this website:
As mentioned earlier, tags can be applied at the subscription, resource group, or resource level. You can always search for Tags in the Azure portal, and the portal will list all tags that are there in your environment, as shown in Figure 2.26. FIGURE 2.26 …
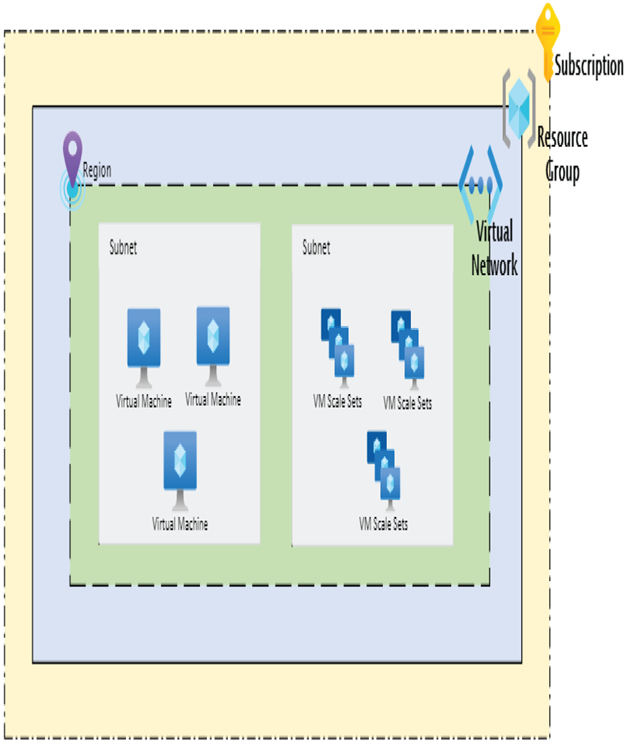
Whenever you are implementing infrastructure, the first thing you should think about isn’t virtual machine; it’s the network. As mentioned earlier, the network is the fundamental building block that enables communication and requires the most planning. In Azure, virtual networks represent your own network in …
In the Chapter 2, “Compliance and Cloud Governance,” you learned what Azure regions are and what role they play in resource deployment and data residency. In the case of virtual networks, they are always scoped to a single region or location. Nevertheless, this doesn’t stop you from connecting with other networks that are in other regions. You could implement solutions such as virtual network peering and VPN gateways to establish connectivity between virtual networks in different regions. In fact, you can establish communication with virtual networks that are part of different subscriptions. We will discuss peering and gateways in Chapter 4, “Intersite Connectivity.”
When you create a virtual network in Azure, you will get an option to choose the region. Depending on the region you choose, the virtual network will be deployed to the respective region, and the virtual machines deployed to the virtual network will also fall under the same region. If you want to move a virtual network deployed in one region to another region, you need to use Azure Resource Mover feature.
Subscription
When we discussed concepts related to Azure Active Directory, you learned that an Azure subscription creates a billing boundary and a resource boundary. In the case of networking, a subscription acts like a home for the network. In a subscription, you can have multiple virtual networks scoped to different regions. This linkage to the subscription helps in billing the organization for different networking-related charges.
For example, if you have a virtual network with the name VNet-1, then the resource ID will be as follows:
Now you will take a look at the IP addressing methods available in Azure.
IP Addressing
When you create a virtual network, an address space is required, and the resources you deploy to the virtual network will obtain the IP address from this address space. Resources will be using this IP address to communicate with the resources within the virtual network and other resources in Azure, on-premises, and the Internet. The communication is accomplished with the help of two types of IP addresses, namely, public IP addresses and private IP addresses. Before you learn about private and public IP addresses, let’s understand the available allocation methods for these IP addresses.
Creating Virtual Networks 7. Click Review + Create, and your request will be validated. Once the validation is passed, you can click Create to create the resource. In Exercise 3.1, you created a virtual network with address spaces 10.1.0.0/16 and 192.168.0.0/16. You also added two …
IP addresses can be assigned or allocated in two ways, statically or dynamically. In on-premises, we had a similar concept of fixed IP addresses for our resources; a static IP address is the same logic. With statically assigned IP addresses, the IP addresses do not …
Public IP addresses are associated with a virtual machine NIC, public load balancer, VPN gateways, application gateways, and any other resource that can be accessed from the Internet. Here also we can choose the allocation method to be static or dynamic. However, the availability of allocation methods depends on which SKU of public IP address we are using. The SKU is more like a pricing tier, where you will find different prices based on which SKU you are selecting. Let’s quickly compare the SKUs available for public IP addresses to understand the key differences. The available SKUs are Basic SKU and Standard SKU; Table 3.1 shows the differences between them. You can always upgrade from Basic SKU to Standard SKU.
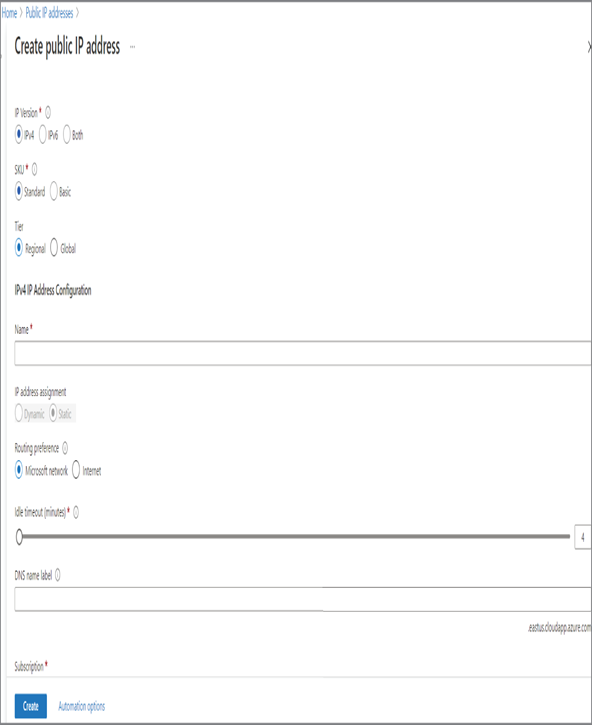
Sign in to the Azure portal and search for Public IP addresses. From the Public IP Addresses window, click Create.
Set IP Version to IPv4 or IPv6 or Both. Depending on which IP version you require, you can select that. Selecting Both would create both IPv4 and IPv6 addresses.
As you saw earlier, you can set the SKU to Basic or Standard depending on the requirements.
Set the tier to the regional tier.
Input the name of the public IP address. This will be a friendly name for you to identify the IP address.
Next is the assignment; you can choose Static or Dynamic. If the SKU is Standard, then the option will be grayed out as Standard SKU supports only Static IP.
You can also add a DNS label. This is an optional field; it is mostly used when the allocation is Dynamic.
You can leave the routing preference and idle timeout with the default values. The routing preference determines how your traffic routes between Azure and the Internet, and idle time out helps you configure the minutes to keep a TCP or HTTP connection open without relying on clients to send keep-alive messages.
Other than these fields, you need to select the subscription, resource group, and location for the public IP address. If you select Standard SKU, then you will get an option to choose the availability zone as well.
10. Once the appropriate values are selected, you can click Review + Create to validate the deployment. If the validation was successful, click Create to create the public IP address.
Once the public IP address is created, you can associate the IP address with any of the supported resources. This IP address will be Internet facing, and users can access the associated service over the Internet using this IP address. Having a public IP address that is open to the Internet leaves an attack vector and makes your workloads vulnerable. You need to use network security groups to control the traffic inbound and outbound to our resources. In the next section, we will cover network security groups and how they can be used to secure your workloads in the cloud.
Network routes or route tables have existed in traditional networks for an exceptionally long time. The routes that are part of the route table decide how to direct a packet to the destination or, in other words, determine which is the next hop the resource …