Custom RBAC Roles – Compliance and Cloud Governance

Using custom RBAC roles, we can create fine-tuned roles that match your organizational needs. This customization offered by Azure RBAC is a boon for administrators. We can combine multiple roles and create a single role, or we can take a built-in role as a baseline and customize that. In next exercise, we will create a custom role using PowerShell.
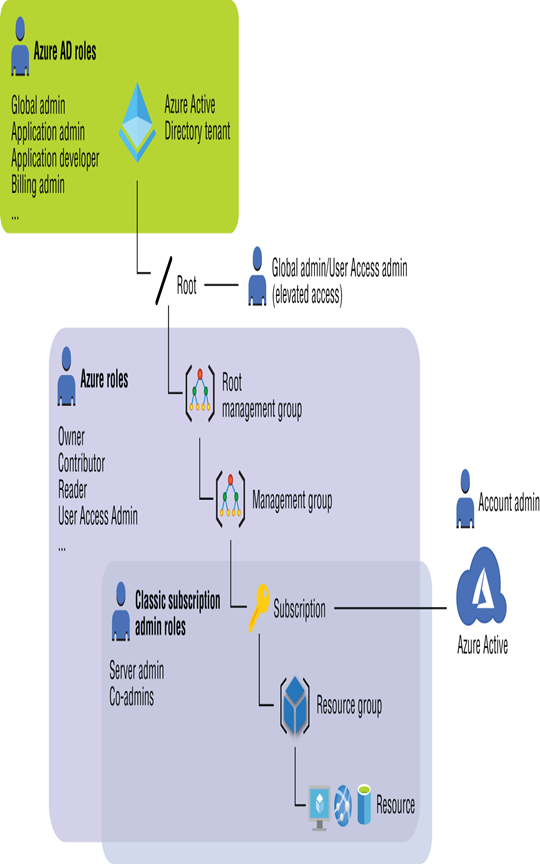
FIGURE 2.19 Role comparison
We can always build from scratch or clone a role and modify it. It’s easy to clone and modify a role as there will be minimal chances of syntax errors as the structure is cloned from an existing role. To explain the components of the JSON definition, we will take the Owner as an example. We have already seen how to extract the JSON when we discussed role definition.
{
“Name”: “Owner”,
“Id”: “8e3af657-a8ff-443c-a75c-2fe8c4bcb635”,
“IsCustom”: false,
“Description”: “Grants full access to manage all resources, including the ability to assign roles in Azure RBAC.”,
“Actions”: [
“*”
],
“NotActions”: [],
“DataActions”: [],
“NotDataActions”: [],
“AssignableScopes”: [
“/”
]
}
Table 2.2 explains the meaning of each component in the JSON manifest.
TABLE 2.2 Azure Role Definition
| Properties | Explanation |
| Name | Name of the role. |
| Id | Unique ID used to identify the role. When we create a custom role, we will leave this field blank, and Azure will automatically assign a unique ID to the role. |
| IsCustom | This flag denotes if the role is a custom role or not. Here we used Owner role, this is obviously not a custom role; hence, this flag is set to false (or BuiltInRole). If you are creating custom role, make sure this flag is set to true (or CustomRole). |
| Description | Description of the role. |
| Actions | Set of specific management operations that the role allows to perform. |
| NotActions | Set of actions that are excluded from allowed actions. |
| DataActions | Set of data operations that are allowed by the role. |
| NotDataActions | Set of data actions that are excluded from allowed data actions. |
| AssignableScopes | Set of scopes where the role is available for assignment. |
The aforementioned properties are shown only in Azure PowerShell. When you are using the Azure Portal, Azure CLI, or REST API, the property names will be slightly different. However, you can easily figure them out. The following is the list of properties shown in the Azure portal, Azure CLI, or REST API:
roleName
name
type
description
actions []
notActions []
dataActions []
notDataActions []
assignableScopes []
In the definition, we can define what operational actions are allowed. Operations are specified in the format {Company}.{ProviderName}/{resourceType}/{action}. The {action} denotes the set of operations that you can perform on a resource type. For example, if you need to grant read access to virtual machines, then the string format will be Microsoft.Compute/virtualMachines/read. At this point, do not worry about how we derived this string. During the exercise, you will see an easy way to derive these operation strings. Table 2.3 shows the set of actions available.
TABLE 2.3 Supported Actions
| Action String | Explanation |
| * | Grants access to all operations |
| read | Enables read operation (GET) |
| write | Enables write operations (PATCH or PUT) |
| action | Custom operations (POST) |
| delete | Allows delete operation (DELETE) |
To complete this exercise, you need to be an Owner or User Access Administrator.
In Exercise 2.4, you will create a role called Virtual Machine Supporter. This role should be able to start/stop VMs and manage support cases. Let’s get started.