Creating a Custom Route 7. After confirming the details, you can click OK, and the route will be added to the Routes blade of the routing table. In short, this route will be applied to the private subnet with the address range 172.17.3.0/24, and all …
Using system routes, Azure automatically handles all packet routing. As mentioned earlier, users can always override these routes using user-defined routes (UDRs). To give an example of routing, assume we have three subnets inside a virtual network. The subnets are the public subnet, DMZ subnet, …
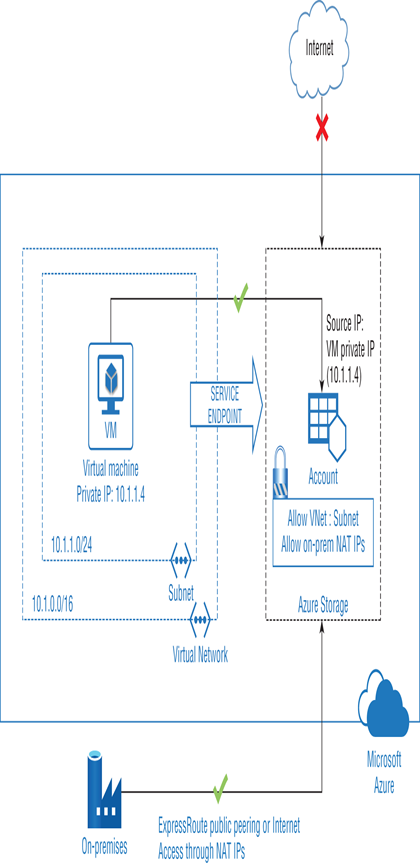
The identity of a virtual network can be provided to the Azure service by using service endpoints. Many services support virtual network access, and with the service endpoint enabled, you can access these services in a secure manner. The communication from your virtual network to the Azure service is done via the Microsoft backbone network. For example, you can have a virtual machine deployed to a virtual network, and you can also have a storage account. On the storage account firewall, you need to allow the communication from the virtual network that the VM belongs to. Using a service endpoint, the VM will be able to communicate with the storage service securely using its private IP address as the source IP address, as shown in Figure 3.3.
Sometimes your virtual network address spaces might be overlapping, and it’s difficult to identify the traffic just based on the IP addresses. Chances are that the traffic is originating from a virtual network that has the same address space as of the virtual network that is supposed to access the service. The service endpoint mitigates this issue by creating an identity for your virtual network and sharing it with the Azure services. All you need to do is to add a virtual network security rule, and your resources will stay secured. This rule completely eliminates the public Internet access to the resources where service endpoints are added and allows only traffic originated from the virtual network. The key point here is that service endpoints can be used for secure communications only from the Azure virtual network; on-premises to Azure services is not supported.
Supported Services
Adding a service endpoint to a virtual network is an effortless process and several services including Azure Cosmos DB, KeyVault, Service Bus, SQL, Storage Accounts, and Azure Active Directory are supported. Let’s understand the list of supported services.
Azure Storage: This is supported in all Azure regions and is generally available. Using this endpoint, you can establish an optimal route to the Azure Storage service. You can associate up to 100 virtual network rules to each storage account.
Azure SQL Database and Azure Synapse Analytics (formerly Azure Data Warehouse): Service endpoints can be used to communicate with the databases in Azure SQL Database or databases in Azure SQL Data Warehouse in a secure manner. These endpoints are added to the firewall of the database to enable access from the subnets. This is generally available in all Azure regions.
Azure Database for PostgreSQL and MySQL servers: This enables you to communicate from your virtual network to PostgreSQL and MySQL servers deployed in Azure. Generally this is available in all Azure regions.
Azure Cosmos DB: Using service endpoints, you can let the resources deployed in your virtual network communicate with the Cosmos DB. This is supported in all Azure regions.
Azure Key Vault: This is available in all Azure regions. By enabling service endpoints, you can limit the communication to the key vault. Only requests from the allowed subnets are permitted to access the key vault; the rest of the requests will be denied.
Azure Service Bus and Event Hubs: Service endpoints for Service Bus and Event Hub facilitates secure access to messaging capabilities from workloads such as virtual machines that are deployed in the virtual network.
It may take up to 15 minutes for the service endpoints to come up after adding them to a service. Each service has its own documentation page stating the steps for enabling service endpoints.
When you are using service endpoints, the traffic will still hit the supported services on their public endpoints, and the source of the traffic will be a private IP from the virtual network. If you would like to access these services using their private IP addresses, then you should consider using a private link. In the next section, we will cover private links.
By implementing private endpoints, Azure PaaS services will get a private IP address on your virtual network. As the service is assigned with a private IP address, whenever you send traffic to a PaaS resource, the traffic always stays within your virtual network. Private endpoints …
We are familiar with the DNS servers that we used to administer on-premises. Some organizations used Windows Server as the server for hosting DNS zones, while others used BIND-based solutions. There are other third party-solutions that are used to manage DNS zones and records. In …
Azure DNS supports all common DNS record types including A, AAAA, MX, CAA, CNAME, PTR, SOA, SRV, and TXT records. You are familiar with these records as they are used in traditional DNS servers as well. The categorization is done based on the data stored on each of these records. For example, A records map a name to an IPv4 address, and AAAA records map a name to an IPv6 address. Similarly, each of the record types has its own use-case scenarios.
Record sets are also supported in Azure; these are useful in cases where you would like to create more than one DNS record in a single shot referencing a given name and type. For instance, say you have two web servers with IPv4 addresses 137.12.11.1 and 137.12.11.2. You would like to map both of these IP addresses to the A record www.mydomain.com. In this case, you don’t have to create two DNS records; instead, you can create a DNS record set with the name as www under the zone mydomain.com and add both IP addresses to the same set. Using this all related IP addresses/aliases can be managed under a single record, and this offers ease of management for administrators.
While creating records, you can also specify the time-to-live (TTL). This value specifies how long the clients can cache this record before contacting the DNS server again for resolving the query. By default, this value is set to 3600 seconds or 1 hour. Since we are using records set, the TTL is set for the entire record, not for individual records. The value for TTL can be from 1 second to 2,147,483,647 seconds.
Wildcard records are also supported by Azure DNS. As we used to add wildcard using * in on-premises, we can add wildcards by setting the record name as *. You can also use wildcards as a leftmost label, say *.foo. All records matching this expression will be returned by the name servers.
Next, in Exercise 3.8, you are going to add records to the zone you have created.
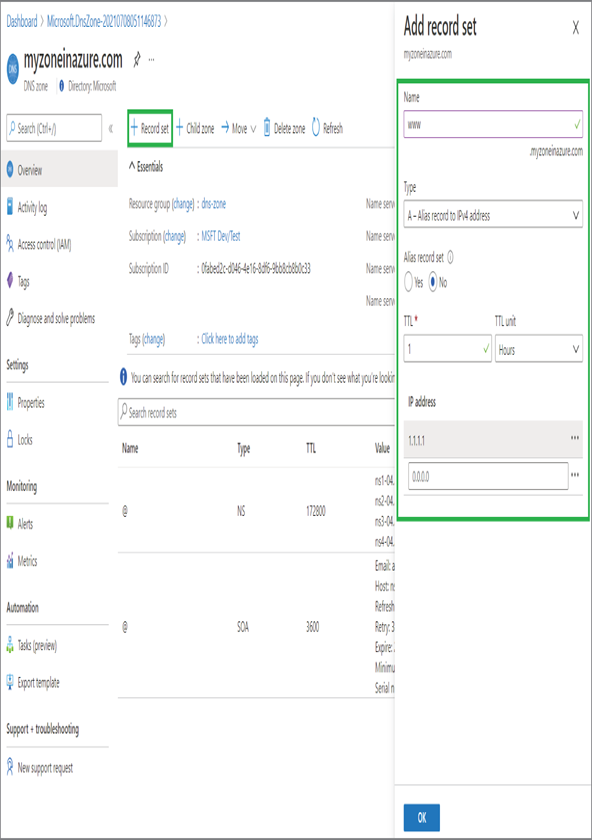
Sign in to the Azure portal and search for DNS zones and click DNS Zones. Select the DNS zone you created in Exercise 3.7.
Click + Record Set to add a record set. You need to provide the name, type, TTL, and value for the record set. In this demonstration, you are creating an A record, and you can provide the values shown here.
After the record is added, it will be available in the records list.
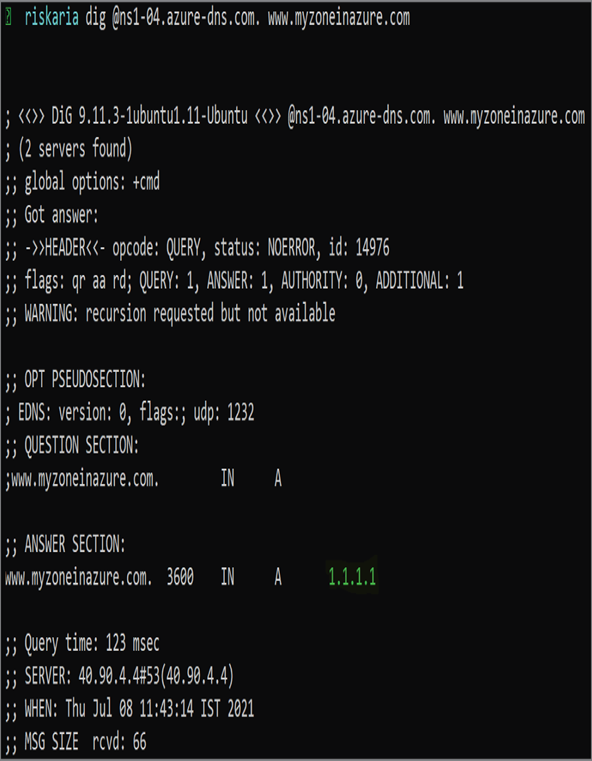
Now you can open the nslookup utility if you are using a Windows computer or the dig utility if you are using a Mac/Linux computer to query the record. You need to copy the name of any name server and run the queries pointing to that name server to obtain results. In the graphic shown here, the dig utility is used to query the record, and we got the response as 1.1.1.1 as we saved in our DNS zone. The syntax for dig is dig @nameserver .
From this activity, you learned how to use Azure DNS zones to host our zones and add records. These records will be available if you point the query to one of the name servers of the zone. This process is equivalent to you creating a DNS zone in a Linux or Windows server and querying the server to resolve the record. While we were searching for DNS zones in the Azure portal, we saw there is another option called private DNS zones. Let’s see what private DNS zones is.
This proves that the virtual network link added to the private zone is working and the virtual machine is using the private DNS zone for name resolution. You can create another VM in the same virtual network, and the record will get automatically registered to …
As mentioned earlier, Azure DNS can be used to provide name resolution using the Microsoft infrastructure. In Exercise 3.7 and Exercise 3.8, you created a zone and added records for query validation. The zone we hosted in that exercise is an Internet-facing DNS zone because …
In quite simple terms, network security groups are a functionality in Azure used to filter and limit inbound and outbound traffic; in other words, they are similar to firewalls. An NSG is a collection of security rules that can be used to allow or deny inbound or outbound traffic. NSGs play a vital role in protecting VMs and other workloads that are deployed to a virtual network. Though we haven’t covered virtual machines yet, it’s good to have an understanding of NSG before we start talking about VMs. Each VM uses its network interface for communication with the resources in Azure, on-premises, and on the Internet. NSGs can be associated with a subnet, or a network interface based on your requirement. NSGs are reusable, which means you can have multiple NICs or subnet associations to a single NSG. NSGs operate at layer 4 of the OSI model.
NSG Concepts
Before we create an NSG, it’s important to understand the concepts related to NSG. As mentioned earlier, NSGs can be associated with subnets or NICs; let’s understand the purpose of these assignments and other concepts.
Subnets
Protected screened subnets can be created by assigning an NSG to subnets. You can protect all the workloads in a subnet by associating NSGs. Once you associate them, all traffic will be evaluated based on the rules you have added to the NSG. You can associate zero or one network security group to each subnet.
Network Interfaces
You can associate an NSG with the NIC of the virtual machine. All traffic that flows through the NIC will be evaluated based on the NSG rules. If you have an NSG associated with both subnet and NIC, then you will follow the effective NSG rules. We will cover the effective NSG rules in the next section. Each NIC can have zero or one NSG associated to it. When you create a VM, the NSG is automatically created with it and associated with the NIC, unless you specify another NSG.
NSG Rules
An NSG is a collection of security groups that can be used to filter inbound and outbound traffic of subnets and NIC. Whenever you create an NSG, there will be some default rules added by Azure to facilitate the virtual network traffic and load balancer traffic. Rules can be created by specifying the following parameters:
Name: This is a friendly name given to the rule to identify the rule, which is unique.
Priority: Priorities can be used to prioritize rules, and the value can be between 100 and 4096. The lower the value, the higher the priority. If you have a deny rule with priority 100 and an allow rule with priority 110, the deny action will be executed. This priority range doesn’t apply for the default rules, and it gets automatically applied by Azure. Also, it’s not possible to create two rules with the same priority.
Port: Specify port numbers or a range of ports for both the source and the destination.
Protocol: This can be Any, ICMP, TCP, and UDP.
Source: This can be Any, IP addresses, application security groups, or service tag (a set of IP addresses maintained by Azure representing Azure services).
Destination: This can be Any, IP addresses, or service tag (a set of IP addresses maintained by Azure representing Azure services).
Action: This is to allow or deny traffic.
The rules are evaluated based on the priority value you assign to the rule. The lower the value, the higher the priority. For example, if you have a deny rule with a priority of 200 and an allow rule with priority 300, the deny rule will take effect as the lower value takes higher priority. There are two types of rules.
Inbound rules: By default, there will be three inbound security rules (allow virtual network traffic, allow load balancer traffic, deny all other traffic) added to an NSG when you create NSG. All inbound traffic except the traffic from virtual network and Azure load balancer is not allowed. If you need to allow additional traffic, you need to add a respective rule. For example, if you are connecting to a Linux machine, you need to add an inbound rule to allow traffic on TCP port 22.
Outbound rules: By default, there will be three rules: allow outbound traffic to the Internet and virtual network and deny all other traffic.
You will see how these rules can be implemented when you perform Exercise 3.10.